Pages

Thursday, December 31, 2015

Most Popular Blog Posts In 2015 - DIY180

Happy New Year's! Hope you are having a wonderful time with your families and friends! As we close out 2015, I have the pleasure of joining some fabulous bloggers on our last blog tour of the year. What fun to end the year with a round up of the best blog posts for 2015. Do join in on the fun and at the end of this post, make sure to stop by and visit the other amazing bloggers! If this is your first time to DIY180, thank you for being here, I love meeting new friends.


Next favorite is the Monogram Wall Art.


Inspirational Kids Wall Art was a hit.


There you have it, DIY180 popular post in 2015. I am wishing you and your family a Happy New Year's. Don't forget and see what popular posts the other lovely bloggers had in 2015.  

Don't Miss a Thing!

If you like what you see, there are several ways to follow along!


Now here's some other great Top Ten Posts of 2015 from some blogging friends for you to check out...
Top-Ten-Posts-of-2015-Blog-Hop

Tuesday, December 29, 2015

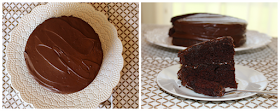
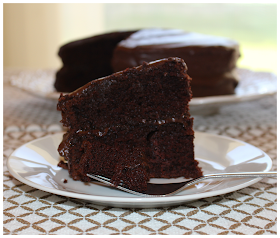
Chocolate Cake Recipe - Not So Decadent

What a wonderful Christmas I had to spend with my family and now we get to bring in the New Year's in a couple of days. How awesome is that? Today, I am thrilled to be joining some fabulous bloggers and we are going to share our favorite recipes. This tour is going to be amazing, so make sure to stop by at the end of this post and visit the other ladies!

The recipe I am sharing is not my own, but one I have used for the last 6 years and my family and friends love this cake. This chocolate cake is so perfect because the cake and the frosting is not rich or too sweet, but just right. This cake will be a hit in your next party. You can find the cake and the frosting recipe to Perfectly Chocolate Cake here

www.diy180.com
I did not use the Hershey's cocoa powder but Chatfield's. Just use a good quality cocoa powder. Before adding your wet ingredients make sure to sift all the dry ingredients. Another tip when you add your batter to the cake pan make sure to tap the pan on the counter before putting them in the oven. This will remove all the air in the batter. 

www.diy180.com

To change this recipe up I have added 1 tablespoon of instant coffee or add 1 teaspoon of grated lemon rind to the batter. All I have to say is delicious! If you don't want to make a cake just use your cupcake pans as well. Now, go visit the other bloggers for some more inspiration. See you next year. Happy New Year's!   

www.diy180.com


If you like what you see, there are several ways to follow along!


Monday ~ Appetizers
Tuesday ~ Desserts

Friday, December 11, 2015

Pumpkin Oatmeal Raisin Cookies - Christmas Cookie Exchange

Today I am apart of the The Christmas Cookie Exchange hosted by "The Everyday Home". I am so excited you are here today and if this is your first time to DIY180, Welcome! I hope you will come back to visit again because I love meeting new friends. I am thrilled to be apart of the Christmas cookie exchange and sharing my favorite cookie recipe along side some very talented bloggers. You are in for a real treat, so make sure to visit all these lovely bloggers at the end of this post. 

My favorite time of year is Christmas. I love all the Christmas decorations, cooking and baking. Baking is a must for me and every year I will go through my recipe binder. I will always make the favorites or create a couple of new ones every year. I love to experiment with recipes and my family are my test subjects. So, today I am so happy to share with you one of my favorite cookie recipes,  pumpkin oatmeal cookies. Doesn't that remind you of your childhood?  

Pumpkin Oatmeal Raisin Cookies


Pumpkin Oatmeal Raisin Cookies

Ingredients Needed: 

2 cups of unbleached flour
2 teaspoon of ground cinnamon
1 teaspoon of nutmeg
1 teaspoon of salt
1/2 teaspoon of baking soda
1/2 teaspoon of baking power
2 1/2 cups of packed light brown sugar
1 cup of butter softened
2 eggs
1 teaspoon of vanilla
1 cup of solid pack pumpkin
5 cups of uncooked old fashioned oats
2 cups of dried raisins

  1. Preheat the oven to 350. Than lightly butter a cookie sheet and line with parchment paper. The butter helps to keep the parchment paper in place.
  2. Sift all the dry ingredients - flour, cinnamon, salt, nutmeg, baking soda, baking powder and place in a medium bowl. Set aside
  3. Beat the brown sugar and softened butter on medium speed for 5 minutes till fluffy.
  4. Next, beat in the eggs and vanilla till blended, then add the pumpkin and beat on low till blended.
  5. Take the flour mixture and beat into the wet ingredients till blended. Then add the oats and mix well. 
  6. Finally, stir in the raisins.
  7. Using a tablespoon, scoop the dough and drop 2 inches apart on the cookie sheet. Bake for 15 minute but half way through the baking process, turn the cookie sheet around so the cookies can brown evenly. 
  8. Once golden brown, remove cookies from the oven and wait 3 minutes before transferring them to a wire rack.
Christmas oatmeal pumpkin cookies This recipe will yield 25 to 35 cookies and the texture is chewy and soft. This is by far one of my favorite recipes and hope you enjoy making them as well as eating them. 


Pumpkin Oatmeal cookies Christmas

Don't Miss a Thing!

If you like what you see, there are several ways to follow along!


Hugs, 

Vanessa

Sunday, December 6, 2015

Potterybarn Silhouette Reindeer Knockoff - "Home For Christmas" Hosted by Hometalk and Country Living


I am so glad you are here today and if this is your first time visiting DIY180, welcome! I hope you come back because I love having new friends here. Today I am so thrilled you are here because I am honored to be apart of the "Home For Christmas Blog Hop" (#HomeforChristmas) being sponsored by Hometalk and Country Living! Wow, do we have a great line up of Christmas inspiration for you to see. Come join us and enjoy!

I am sharing with you one of my favorite projects to create - Potterybarn Knockoff's! Do you remember last year when I recreated Potterybarn snowman pillow? It was such a big hit I have to recreate another Potterybarn knockoff. I recreated my version of their Silhouette Reindeer wall art. It's on sale right now for $103. However, I recreated my version for $6.00 dollar and I am so happy with it. 


This post contains affiliate links. 

Supplies Needed - 
Birch wood
FolkArt Inca Gold Paint
Contact Paper
Scissor

I purchased the birch wood piece from Michael's with a 40% coupon. It was a great deal at only five dollars. I painted the the wood using white chalk paint and gave it a light sanding. I used a 600 grit sandpaper because it makes the painted surface smooth. The next step was creating a front view silhouette reindeer. Luckily, for me I found one online and was able to download the PDF file for free. Fabulous! Once I printed off the reindeer, I knew I needed to enlarge the copy so a quick trip to Staples and 21. cents later I was ready to trace my reindeer onto my contact paper. Yes, you heard correctly, contact paper. Contact paper is great when you don't have one of those fancy cutting machines. Once the tracing was done I was ready to carefully cut out the reindeer and place it on the wood. When placing the contact paper I used a credit card to ensure the edges were sealed completely. 

I painted over the entire surface and let it dry for 30 minutes before doing the second coat. When the paint was almost dry I carefully removed the contact paper and voila! My Silhouette Reindeer!  


I am so happy how it turned out and it looks great with my gold Christmas theme I have going on this year. There you have it. My version of the Silhouette Reindeer! You can find the reindeer file on my Pinterest


Thank you Hometalk and Country Living for hosting this fabulous Home for Christmas! Make sure to visit www.Hometalk.com and www.CountryLiving.com for more inspirational ideas. #homeforchristmas 


Don't Miss a Thing!

If you like what you see, there are several ways to follow along!


Friday, December 4, 2015

Christmas Wrapping Made Easy

Welcome to the 2nd annual Home for the Holidays Blog Tour hosted by Sondra Lyn at Home. Wow, do we ever have a great week of holiday celebration ideas lined up for you!
Join us each day for inspiration from nearly 30 of the today's finest blogs!

Home for the Holidays 2015 - Sondra Lyn at Home

Be sure to check back every day this week to enjoy all the holiday goodness we'll be sharing with you! Each day's links will be posted that day and will go live at 7am EST/6am CST, so don't miss a single day!

What a great time of year and I am so happy you are here visiting me today. I have some fun and easy tips on how to wrap those special gifts for your loved ones. When I was in High School my second job was working at a department store wrapping gifts for 3 months. Ever since then, I used what I've learned and I add different elements to make each gift different. Sure, we can use those premade gift boxes or gift bags, but I love the idea of making everyone's gift special and unique. 
Supplies need:
  • Assorted wrapping papers
  • Assorted ribbons
  • Gift boxes 
  • Tissue Paper
  • Two sided tape
  • Scissors
  • Pre-Made gift tags or homemade ones
I love using all kinds of ribbons, but my favorite are the vintage spools of ribbons I acquired over the years. Using beautiful wrapping paper, with festive ribbon, makes your gift so special.  

When wrapping a gift, make sure to trim the wrapping paper on all sides and if you have a gift that is smaller than the box then add tissue paper to keep it in place. 

I love making simple bows, here is one that just requires a mini staple or can simply be tied. 


This is just the beginning of my gift wrapping and I have more to go. I can't wait to get all my shopping done. From my home to yours, have a blessed and peaceful Christmas. 


You'll see everything from gorgeous decor to yummy holiday recipes... and everything in between! Here's a look at what's coming up this week:

Cause we all know...

there's no place like...

Home for the Holidays!

Monday - Holiday Decor


Tuesday - Holiday Recipes 


Wednesday - Holiday Mantels and Tablescapes


Thursday - Holiday Crafts 


Friday - Holiday Gifts and Wrapping


Tidy Up Giveaway

Tidy Up Giveaway-

I am so happy to be participating in a fabulous giveaway over at Katherine Corner. Join in on a chance to win this fabulous cash prize and book. This would be a great way to end the year.

One winner will receive-

A Hard Bound Copy of The Life-Changing Magic of Tidying Up by Marie Kondo

and $175 in cash to get your new year off to a tidy start


This months Paypal cash is brought to you by Katherine and some of her sweet bloggy friends

listed in no specific order
Christine- I Dig Pinterest

Entering the Tidy Up Giveaway is easy-

Just log into the entry form using your email address or facebook and get started.
Enter one or all of the entries. Giveaway starts Dec 4 and ends Dec 30th

Sunday, October 18, 2015

Fall Pumpkin Flag - Home For the Fall

Welcome to the "Home for Fall Tour! This is a blog tour and is filled with some amazing bloggers sharing their favorite and creative fall home decor. At the end of this blog post make sure to stop by and visit the other ladies on this tour! 


I love anything that has to do with fall. Pumpkins, cinnamon and warm fall colors makes me happy and I look forward to changing my home from summer to fall every year. This is my way of making up for the fact that I now live in Florida and I miss the change of seasons very much. My way of making it fall in our home is by adding warm fall colors and pumpkins throughout my home. Today, I am sharing one of my fall monogram flags. 

Supplies you will need:

Fabric: in neutral ( I used a drop cloth fabric cut out 20 inches long by 13 inches wide) 
Paint :Color Sweet Potato, White, Nutmeg Brown, black by Apple Barrel and Lime Green by Folk Art
Variety of paint brushes
Letter Stencil  
Iron


I had this flag that I used as a template and I added additional seam allowances. For the top I added 2 inches and 1 inch on each side. (*note - I did not need to add seam allowance for the bottom, because the fabric was already hemmed, so just add an additional 1 inch for the bottom as well. This will make your fabric 21 inches long and 14 inches wide)

As you can see the picture on the left I folded the sides of the fabric by 1/2 inchs and ironed. Once I ironed the sides (top picture on the right) I folded the sides again by 1/2 inchs and ironed. I then hot glued down the sides (lower left picture). 
This next step is easy, unfortunately I forgot to take a picture. I folded the top of the fabric 2 inches then ironed and hot glued down. The top opening is where the flagpole will insert so just make sure the opening on the top is big enough for your flagpole. If you need to fold the bottom seam, go ahead and do so and hot glue down.  

The next step I used this pumpkin I picked up at the Dollar store and traced it to the fabric. Once I was done tracing, I used the paint color Sweet Potato and painted my pumpkin. Once I was done painting the pumpkin, I created circles and using the brown paint I painted the circles. Once everything was dry, I painted along the outline of the pumpkin and circles using white paint. Finally, I used the green paint and painted the stem of the pumpkin. 

Once the flag was all dried I free hand the letter "L" using black paint. Here is the my new fall flag. I love how it turned out! Thanks for stopping by and make sure to visit the other ladies on the tour!


Friday, October 9, 2015

Burlap Pillow For The Fall

Fall is a great time of year for me. It reminds me of the leaves turning and crisp cool weather. Aww, how I miss living up north. Another reason why I love fall is because of the warm colors like yellow's, browns, gold, bronze and reds. Those colors make me happy! 

Fall and Spring are truly my two favorite seasons and when I can change everything from summer to fall I am in heaven. One of the ways I love to change things up is by adding burlap to some of my fall decor. So today I am sharing with you one of my easiest and super cute fall pillow. Throw pillows are a great thing to add to a sofa, chairs or bed and you don't have to pay a lot of money to do so. 

Here are the supplies you are going to need: 
  • Burlap fabric (2 different colors of burlap)
  • Or you can purchase a burlap bag like I did
  • Pillow insert or any stuffing you may have on hand
  • Stencil or freehand
  • Scissors
  • Fabric glue
  • Ribbon or Burlap twine 
  • Burlap flower (either one you make or store bought
  • Gold sharpie pen

1. Cut your color fabric 9 x 9 inches. Next free hand or you can use a stencil but write out the words "Always give thanks" using your Sharpie gold pen. 

2. Once you have finished the writing. Glue the color fabric piece to the center of the burlap bag. Next insert your pillow form or stuffing in the burlap bag and tie off with twine or ribbon. 

3. Finally glue your fabric burlap flower and you are done. 


Didn't I tell you this was an easy project? This is a great gift to give to teachers, family or friends. Thank you for stopping by and you can also stay in touch on my other social media sites. 


Need a fall project idea?  

Wednesday, September 30, 2015

Kirkland Knockoff Fall Home Decor

Welcome to the First day of "Fall in Love with Your Home". This is a blog tour that is filled with recipes, crafts projects, fall home decor, vignette decor and much more. This is a fun fill tour and with 30 bloggers participating, you are sure to be inspired. I love easy and simple fall decor that can be used up to Thanksgiving. Let's face it, who has hours upon end to redecorate for fall, Halloween and Thanksgiving. Its a lot of work that's for sure. I am going to show you an easy project you can add to your home and can be used till Thanksgiving.

Supplies needed:

Tin cans of any size
Burlap ribbon (different sizes and/or color)
Twine
Lace
Buttons, gems etc
Hot glue gun

I was browsing through Kirkland's web site and I thought, I could make this myself with faux flowers. We all have tin cans in our home and I love the ides of using this for tablescape, bathrooms and really just about anywhere in your home.  I love how so many companies are using tin cans and marking them up so much! We can make a set of three for a total of two dollars. This is Kirkland's tin can flower arrangement for $7. 


As you can see, all you need is some supplies. This is an easy project and you will never buy another tin can flower arrangement again. 
Take your burlap ribbon and add hot glue to the backside of the ribbon and place it on the can. Wrap the burlap ribbon around the can and along the way, add a dot of hot glue to keep the ribbon in place. Once you are done with the burlap ribbon, you can either leave it like that or add lace trim, button, gem any embellishment you have around the house. How about an old pair of earrings or brooch!


Have you seen my burlap fall pillow? This is another easy project as well. 


I told you this was an easy project and I love how you can use these to hold flowers or fill with sand and add candles. Great for indoor or outdoor use as well. Thanks for stopping by and make sure to visit my other blogger friends. 


Fall in Love With Your Home Tour  
Thank you for joining me for the
"Fall In Love With Your Home"
sponsored by The Everyday Home.
Please join these fabulous Bloggers to see what
amazing Fall Inspiration they are sharing to help
you "Fall In Love With Your Home."

Fall Crafts Button
{Monday, Sept 28th}


Fall Recipes Button
{Tuesday, Sept 29th}
*links will not be active until 6amEST


Fall Decor Button
{Wednesday, Sept 30th}
*links will not be available until 6amEST


Fall Mantels Buttons
{Thursday, Oct 1}
*links will not be available until 6amEST

Fall Home Tours Button
{Friday, Oct 2}
*links will not be available until 6amEST