Pages
▼
Sunday, October 30, 2016
Sunday, October 23, 2016
Dishing It and Digging It Link Party #119

This time of year I am reminded to always "Be Grateful". See how I created this one of kind art work.
So, now let me turn it over to this week's host
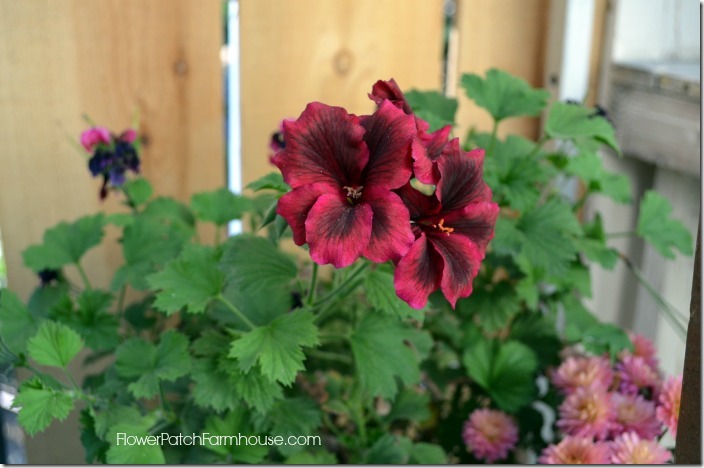
I'm thrilled to see you all back this week! I can't wait to share some great DIY projects, holiday decor and delicious recipes with you! Halloween is right around the corner, and before you know it, Thanksgiving will be here. Time to pull out the decorations and get creative! I'm very excited to share with you my backyard water feature I've been busy working on. The perennials, annuals and spring bulbs are all planted. The solar lights are installed, so it shines bright in the sun all day and glimmers with illumination all night! I never thought a project like this would be so simple, quick and easy. Thankfully, Aquascape makes a seemingly daunting task a snap with their kits available for purchase. Not only that, but I'm giving one of my lucky readers their very own water feature. My post will be live later this week, so don't forget to stop by and enter! I've also been keeping up with my weekly photo a day challenge. Here is my most recent update below. Lately, I've been inspired by all of the fall foliage, New England scenery and autumn decor. I'm happy to say I still have some summer flowers lingering in my zone 6a garden to photograph. Come catch up and see life through my eyes here!
Ready to see some amazing features this week?
 Time for Dishing It & Digging It! Come join the party! #DIDI Click To Tweet
Thank You for linking up with us each week!

Angie - The Freckled Rose | Facebook | Google+ | Twitter
Vanessa - DIY 180 | Facebook | Google+ | Twitter
Linda - Life & Linda | Facebook | Google+ | Twitter
Christine - Rustic & Refined | Facebook | Google+ | Twitter
Lori - The Stonybrook House | Facebook | Google+ | Twitter
Vanessa - DIY 180 | Facebook | Google+ | Twitter
Linda - Life & Linda | Facebook | Google+ | Twitter
Christine - Rustic & Refined | Facebook | Google+ | Twitter
Lori - The Stonybrook House | Facebook | Google+ | Twitter

Please take a minute to read them, they have CHANGED!
○ Please share this party via social media. (Google, Twitter, etc.) Using the hashtag #DIDI
○ A link back to us is NOT mandatory.
○ You can link up 3 posts: Home decor, Tablescapes, Gardening, Recipes and more!
○ Etsy | Amazon | Link Parties are not allowed and will be deleted.
○ Please visit your fellow linkups and leave them a comment. Don't link and run!
○ You are granting us permission to use photo(s) on social media for promotional purposes.
A party button for you!

A Feature button for your use, if you've been showcased!

Remember to pin from the original source and don't link and run.
Thanks for joining us!

Sunday, October 16, 2016
Thursday, October 13, 2016
Handmade Christmas Ornaments
I am thrilled to be joining a group of bloggers in "The 31 Days of Handmade Christmas Ornaments" which is been hosted by An Extraordinary Day, Cupcakes and Crinoline, Yesterday on Tuesday, and The Silly Pearl.
This is going to be a month of inspirational handmade ornaments that you can create for yourself or for others. At the end of this post, you will find the direct links to all the 12 ornaments that have already been posted.
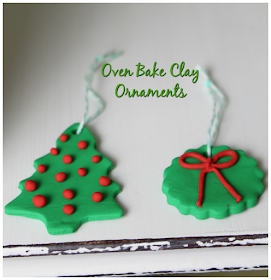
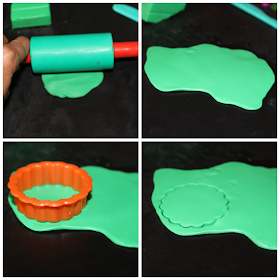
I was looking over my stash and I have over 100 pieces of cookie cutters and lots of oven Bake Shop clay. Here was my inspiration and with oven bake clay, you can create so many beautiful ornaments. I chose the red and green clay, cut off a square and started to soften the clay.
Once the clay was softened, I rolled out the clay 1/4 inch. I picked out my cookie cutter and gently pressed down.
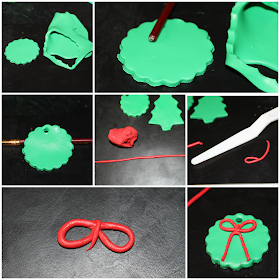
Once I peeled the clay away I used the bottom of a paint brush and created a hole through the clay. To create my red bow, I rolled out a long piece of red clay and cut off a piece about 3' inches. Once I created the loops for my bow, I made sure to add a small piece of clay in the middle, to give it a clean finish. Next, cut off another small piece of clay to create the bottom half of the bow.
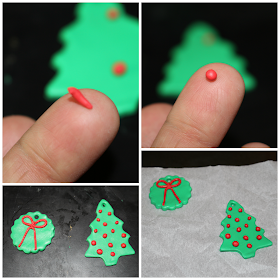
The next ornament I created a Christmas tree. Once I cut out the tree, I took small pieces of red clay and gently rolled it into a ball to add to my tree. When I was done with my ornaments, I took a jelly roll pan, and placed a piece of parchment paper down. I laid my ornaments on the pan and baked it in the oven at the lowest setting (170 degrees) for 30 minutes.
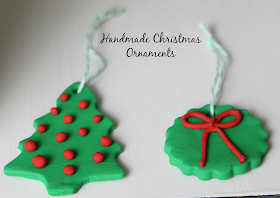
Here is the finished product. These would be great to do with your children and great gifts for family, teachers or friends.
Here are all 31 Bloggers in order of their appearance:
Day 1 - The Silly Pearl :: Day 2 -Yesterday on Tuesday
Day 3 - Cupcakes and Crinoline :: Day 4 - An Extraordinary Day
Day 5 - Knick of Time :: Day 6 - Pet Scribbles :: Day 7 - Simply Kelly Designs
Day 8 - Town and Country Living :: Day 9 - Petticoat JUNKtion
Day 10 - The Everyday Home :: Day 11 - Up on Tippy Toes
Day 12 - Remodelando la Casa :: Day 13 - DIY 180 :: Day 14 - 504 Main
Day 15 - Sum of their Stories :: Day 16 - At Home with Jemma
Day 17 - The Kim Six Fix :: Day 18 - Shabby Art Boutique
Day 19 - Morena's Corner :: Day 20 - My Uncommon Slice of Suburbia
Day 21 - Our Southern Home :: Day 22 - Domestically Speaking
Day 23 - The Crafting Nook :: Day 24 - Sweet Pea
Day 25 - Dukes and Duchesses :: Day 26 - Heathered Nest
Day 27 - Lovely Etc. Day 28 - Stone Gable Blog :: Day 29 - Mod Podge Rocks
Day 30 - Running with a Glue Gun :: Day 31 - All Things Heart and Home
Below you will find a direct links to all the 12 ornaments that have already been posted. Make sure to stop by tomorrow to visit my sweet friend Holly from 504 Main beautiful handmade ornaments.
Monday, October 10, 2016
Wall Art Gallery - SpoonFlower
I am excited to participate in "The Fab Furniture Flippin Contest" for the month of September. The theme is all about "Modern Flair" and the sponsor is SpoonFlower. If you don't know anything about Spoonflower you are missing out on some amazing textiles. SpoonFlower was created as the result of one wifes vision, to create her own design on fabric she can use throughout her home. This one of a kind place is where creative individuals create and upload their designs to SpoonFlower. There is no waste because all textiles are created on demand. They use a digital print process that uses water based pigment inks and dyes. They have over 350,000 designs from independent designers throughout the world, there are plenty to choose from. As a participant in this contest, I received a discount on the fabric I chose, but all the opinions are entirely my own. This post contains sponsored links for SpoonFlower.
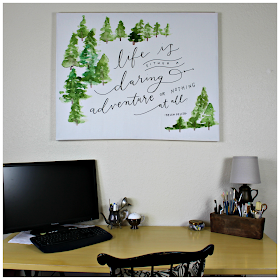
As I was looking at all my options on SpoonFlower, I was in awe with all the gorgeous designs that I can have printed on high quality fabrics or wallpaper. Nevertheless I found a fabric that resonated with me. When I first opened the package, I have to say I was blown away by the gorgeous design and fabric. I did not expect for the print to look like a piece of artwork so enter plan B. I didn't want to sew a huge pillow, so I made this fabric into art for my office.
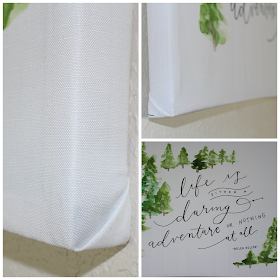
I didn't have a frame large enough so I created a wooden frame. I simple stapled the fabric to the back of the frame and I now have a new work of art for my office. I love it and the saying just speaks to me. Don't you love it?
The trees on this fabric look like it's been hand painted.
The fabric is so strong and sturdy. It's a gorgeous fabric.
It has taken me about 3 months to finish my office/homeschool room. I know it's a long time, but I had some issues with finding the right items and just busyness of life. I am happy to say though, I am going shopping this week for a rug and curtains. Fingers cross I find these items and I can reveal the room.
I want to thank SpoonFlower for providing their gorgeous fabric for this contest. I also would like to thank the ladies over at the Fab Furniture Flipping Contest ™ for this great challenge. If you are a furniture flipper and interested in being a part of next month's challenge, contact the ladies over at info@fabfurnitureflippincontest.com to find out how!
I am linking my project at Colleen's blog, 58 Water Street and Carrie's blog, Thirty Eighth Street. Please head over there to see what other fabulous flippers have done.
Sunday, October 9, 2016
Sunday, October 2, 2016
Dishing It and Digging It Link Party #116
Welcome to the the Dishing It & Digging It Link Party. We appreciate you joining us.
This is the season for baking and I love making my families favorite Oatmeal cookies. Stop by and see how these soft and scrumptious cookies will be a big hit.

Your host this week is:
Angie Lituri - Angie The Freckled Rose | Facebook | Google+ | Twitter
Vanessa Lund - DIY 180 | Facebook | Google + | Twitter
Linda McCaskell Primmer - Life & Linda | Facebook | Google + | Twitter
Christine Graves - Rustic & Refined | Facebook | Google + | Twitter
Lori Leeper - The Stonybrook House | Facebook | Google+ | Twitter
Vanessa Lund - DIY 180 | Facebook | Google + | Twitter
Linda McCaskell Primmer - Life & Linda | Facebook | Google + | Twitter
Christine Graves - Rustic & Refined | Facebook | Google + | Twitter
Lori Leeper - The Stonybrook House | Facebook | Google+ | Twitter
Please take a minute to read them, they have CHANGED!
- Please share this party via Social Media. (Google, Twitter, etc.) Using the #Hashtag #DIDI so we know who is a giver.
- A link back to us is NOT mandatory.
- You can link up 3 posts: Home decor, Tablescapes, Gardening, Crafts, DIY Projects, and Recipes.
- Etsy | Amazon | Link Parties are not allowed and will be deleted.
- Please visit your fellow linkups and leave them a comment. Don't link and run!
- By joining our linkup, your are granting us permission to use your photo(s) submitted on Social Media for promotional purposes.
So let's get this party started! Remember to pin from the original source and don't link and run.
Thanks for joining us!


