Pages

Monday, December 31, 2012

New Year's Resolution 2013 - Grateful Jar

Happy New Year's everyone!

As I am thinking about the year coming to an end I reflected back on all I have learned, experiences and my heart is full of gratefulness. So, I came up with an alternative to the New Year resolution list and I am doing a New Year's grateful jar. The reason behind this is a bit long, but I am going to give you the short version. Three years ago my husband lost his job, but in those three years we have done so much growing then we can ever imagine. It was tough, scary and we (I, mostly) worried a lot, but I remember what my former pastor always told me over and over "What the devil meant for bad God will turned it around for good" and "You are NEVER too old to learn". With this great advise I slowly (through prayers) started to unlearned what I have learned, meaning I needed to stop worrying and trust God's word. I needed to learn to venture out of my comfort zone and learn new things, for example how to shoot photos and edited them (still learning). I needed to change my bad/negative thinking into what I have learned and heard for years, I can do anything with God, who is for me. I know I don't ever talk about my faith on my blog, because my blog is about what I have created, but along this journey of blogging I am recreating a new me. I am opening up and being real with you all today, which by the way is hard for me to do on my blog, because this is the Internet of course. But in doing this I hope to encourage you and inspire you to not look to just what you want to accomplish in 2013, but also appreciate all you have accomplished and having a grateful heart.  So when you experience hard times you can go into your New Year grateful jar and remember and gain strength to see you through the difficult times. You see I am a believer you can do all things, because God had put it in you to create and inspire many, not with your DIY's but with your words. You will never ever see me saying or leaving negative comments on anyone's blog or if I am talking to you I will always encourage you and uplift you. I genuinely care for my families, friends and strangers. I care for peoples well being and I know we have a will to choose what road we want to take, but I pray it will be a road of growth, building up, creating, sharing and loving. Dare to change and improve on you and change those unlovable bad habits and see how much your world will change. You will see things so differently. Yes, changing can be a difficult thing, but I keep it real with myself and point to myself when I make a mistake and missed the mark. I also have a very loving and amazing husband who will point out to me (in a loving manner, of course) my shortcomings. Now, remember don't ever point out people's shortcomings and how they should improvement, but look at yourself. I have found people who are doing the finger pointing are the ones that need the most improvement. I don't care if you are 20 or 87 you are never, I mean NEVER EVER to young or old to unlearn, relearn and learn. This another great piece of advise my pastor told me and he is 83 years old.

Clean jar and chalkboard paint.
Tape it off and just painted the center of the jar. Let dry and spray paint the lid.

Here is my grateful jar and every week I will put in my jar what I am grateful for and I can go back into my jar any time and read what I wrote so I can remind myself how far I have come. I love to think of this project as a project that is changing my heart into one of gratefulness. By the end of 2013 I will go through each one and remember and thank God for all is goodness and benefits and also come up with a plan to take those notes and add them to a DIY project.

Me! Plan on taking professional pics soon. 
Happy New Year's to you and yours and be safe. Praying for a prosperous year for you! See you next year! : - )

Hugs,

Vanessa

Wednesday, December 26, 2012

Coconut Flan Dessert

Hoping you all had a great Christmas with your family and friends. I had a great time. Cooked a lot and now I feel so tired I just don't want to do anything. : )

Just wanted to share with you this creamy and caramelize goodness so you can make this for New Year's.

You need the following ingredients - 
1 cup of granulated sugar
1/3 cup water
1 can (14ounce) sweetened condensed milk
1 cup canned coconut milk 
4 eggs
1/2 teaspoon vanilla extract
1/2 teaspoon coconut extract
1/2 cup coconut

1. Heat over to 325 degrees
2. Place sugar in heavy bottomed medium size saucepan and pour 1/3 cup of water over the sugar. Stir to dissolve, then bring to a boil over medium high heat. cook, without stirring, for 10 minutes until amber colored. Pour into a 9 inch glass pie plate and coat the entire bottom. 
3. Blend condensed and coconut milks, eggs, vanilla and coconut extracts in a blender. Pour into prepared pie plate. 
4. Place pie plate in a large roasting pan and add enough hot water to come halfway up the side of pie plate. Bake at 325 for 45 minutes, until custard is set. 
5. Transfer to wire rack, let cool and refrigerate until completely chilled for 4 hours or overnight. 
6, To serve, run a sharp knife around the edge of custard. Taking a large plate, invert onto the plate letting the caramel run over top. Garnish with coconut. 


This is what the flan look's like once it comes out of the oven and before I turn it upside down onto my large plate. The caramel on the bottom of this flan is so yummy, but of course I forgot to take a picture of this. Sorry, give this a try for New Year's and let me know how you love it! I plan on taking the rest of the week off, to spend time with my kids and celebrate my mom's birthday. I love to hear from you so leave me a SWEET comment. Have a great week and Happy New Year's!

Hugs,
Vanessa

Monday, December 24, 2012

Merry Christmas 2012

The eve before Christmas and I am busy cooking for tomorrow's meal and I have a delicious spanish meal for my hubby and kiddos tonight. Tonights we are going to have rice, black bean and roasted chicken and for dessert a coconut flan. Yummy!

As I was cooking just thinking about you and I wanted to take a moment and wish you and your families a Happy and Bless Christmas. Pray you all have a safe and happy time with your families and friends. I am truly grateful for all of you and pray you will have a prosperous new year!

I have some pictures to share with you all.


My tree has all gold and red. I guess I will always be traditional at heart.  
I thought I give you a better picture of my mantle. I went all gold with pop of red. : ) 

These drawing were from my son and daughter and just had to add them to the decorate. 
An early Christmas gift from my sister and it's red because she know I love red. TY, sis
Very sleepy little girl and its not even Christmas. LOL


Saturday, December 22, 2012

Christmas Home Decor 2012

Happy Friday! I hope all of you are keeping warm and looking forward to Christmas! Here are some of my Christmas decor for this year.


I want to wish you and your family a very Merry Christmas! Enjoy your time with your family and friends and keep warm. I LOVE your SWEET comments, so drop me a line. 

Hugs, 

Vanessa

Wednesday, December 19, 2012

Etching Glass

I have a project update on my etching glass jars. I decided I wanted to add words for example Joy and Noel. Using the same steps on my etching glass jars this is what I came up with.

I created these etch glass, but then I also used the mirror glass spray on the inside to give it a different effect as well. 
I etch Noel and wrapped with jute and added a bead. You can add ribbon on the top also.  
I created two JOY jar and added beads as well. This one is a gift for a friend. 
The little one on the far right I etch free hand. Just got creative and with the etching cream and mirror spray these came out lovely.  This is a great gift for anyone. 

I just love using this etching cream and I have more ideas on how to create etch glass as well, so expect to see more. : )
It's always fun to share my ideas with you and remember this is the season of being crafty and handmade. I Love to hear from you so drop me a line. Have a great week.

Hugs,

Vanessa


Monday, December 17, 2012

Upcycled Christmas Garland

Today, I am up-cycling an old Christmas garland that has seen better days. You'll just need a green garland (I've seen them at the dollar store), wire ribbon, glitter and non-giltter ornaments and two rolls of Poly Deco Mesh.

Take each end of the garland and place a heavy book to hold down the garland. This will make the garland from moving all over the place.
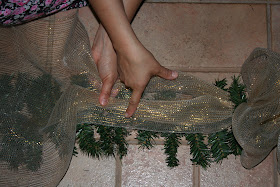
Gather the mesh in your hand 
Mesh should be 9 inches long
Make a poof  
Tie the mesh using the garland. Continue all the way down
First layer.
I added second layer, by using the same method.
Using the same method as the Deco Meash, starting at the top tie off ribbon with the branches of the garland and just go side to side and skipping ever other poof. 
Here is how it will look. 
It's so much fuller with the ornaments and ribbon. 


I love how the garland looks, its so fluffy and full. It looks great on top of my entertainment center. This would also look great over the fireplace or your entry way. Thanks for stopping by and wishing you and your family a very Merry Christmas!

Hugs,

Vanessa


Thursday, December 13, 2012

Craftaholics Anonymous Holiday 2012 Handmade Gift

Happy Thursday!

I just wanted to share with you this GREAT gift I received from my Jenn from Craftaholics Anonymous Holiday Handmade gift exchange.

I love this box! 
LOVE, LOVE it All! Looks at those handmade note cards, how lovely! 
I plan on having this lovely me time tonight while my husband and son are at the movies and my little girl is sleeping. This gift blessed my heart and I am grateful to Jenn! Jenn, you were the best secret elf. : )

Well, I am off to pick up my son from school. Thanks again for stopping by and see you tomorrow for another tutorial and giveaway. 

Hugs, 

Vanessa


Wednesday, December 12, 2012

How To use Etch Glass!

This is the much-requested tutorial on how to Etch glass without using a Silhouette or Cricut machine. I'm sorry for the delay in getting this post up but it has taken me 4 days to write it, because I had to be so detail in this post. This post is long, but I wanted to make sure you had all the information needed to do this project correctly.


1. Materials needed - contact paper in clear (I found this roll at the dollar store), scissor, Xacto knife, Armour etching cream, glass jar, brush, healing mat, tape, gloves and my print out I created from my computer. I created Joy and the letter "B & L" 
2. I cut the contact paper to 11x11 and tape to healing mat. Next I took the letter "B" and trim around leaving about 1 1/2 inches around the letter and turn upside down and tape on top of contact paper.
3. With a sharp Xacto knife I follow the outline of the letter and I took my time with this process because I wanted the lines and curves as straight as possible.


4. Once cut remove the copy letter and see how the contact paper is cut. I removed the contact paper cut "B" and set aside. 
5. I'm left with the outline of the letter "B", this is the template that will adhere to the glass. I removed the outline from the healing mat and set aside. 
6. Tape the "B" cut out of contact paper on the healing mat.
7. Then I place the copy letter back on the contact paper and tape to healing mat. 


8. I carefully cut out the bubbles on the "B" 
9. Nice cut out. : )
10. Remove the bubbles and set aside.
11. Some of you my think this is my template I will be using on my jar, but it's NOT! This "B" I do not use and I save it for another project. I bet some of you are already thinking about how to use it. LOL! I am not going to tell, but there is a follow up project. : )


12. Remember in Pic 5, I set aside the outline of the "B" well I adhered to the glass. I had to work with it a little so everything lines up correctly. I did make a cut in the bottom to make it fit smooth.  
13. I placed the copy of the letter over the glass so I know where to add the bubbles.
14. The outline in pic 5 and the bubbles from pic 10 are in place.
15. With a pen I made sure all the edges are smooth and adhered to the glass


16. This is what the contact paper looks like. Not too bad.
To get the glass to not roll I added my scissor to the bottom. See the pink on the bottom right on Pic 18? Works great!
17. I put on my gloves and stirred my etching cream. I made sure there is only etching cream on one side of the brush. When applying the cream I started from the top and add a thick coat. Not thin where is see through, but a bit heavy. ***Read the direction on your bottle for every brand is different. ***
18. Here is what it looks like when I am done applying the cream. I waited 2 minutes and rinse off with cool water and pat dry and let sit for a couple of minutes before removing the contact paper.
19. Do you see the edges have a white line on the top left side? I am going to remove that. Didn't look right to me, so this is what I came up with.


20. Gently, using my Xacto knife I removed the white line on the edge. It came right off.


I just love how this came out and I have other projects to show you as well. Thanks for stopping by and remember it's the season for being crafty and the season for handmade! I Love to hear from you so drop me a line and if you make this project and send me pics. : )

Hugs, 

Vanessa 

Wednesday, December 5, 2012

Handmade Ceramic Coasters!

Winners of these two coasters sets are Nancy and Kirsten! Thanks again for all your support ladies! 


Sorry this post is late, but my days are just flying by and I cannot seem to catch up. Phew! Maybe by this weekend, I will be able too, keeping my fingers cross. : )

Here is the tutorial for the handmade coaster. These are great gifts for teachers, friends, family and co-worker.

Materials need - Scrapbook paper, metallic paint, rubbing alcohol, Mod Podge, paintbrush & sponge, felt, E6000 and tiles. First thing you need to do, is wipe your tiles with rubbing alcohol then go on to the next step.
I used FolkArt Metallic Silver paint. Next paint around the edges and sides.
I used a sponge and dabbed around the edges. No need to paint the entire tile, because you will be covering the center with scrapbook paper. Let paint dry about 15 minutes.
Cut your scrapbook paper to size. I have a round corner puncher that I used to give the paper a rounded look. 
Next step apply Mod Podge to the tile or back of the scrapbook paper.  Apply the paper to the tile and use a spoon handle or fingers and smooth out the air bubble and make sure the edges adhere to the tile. Let dry for about 15 minutes.  Then going in a vertical motion (not up and down or side to side, but go from top to bottom) brush on the Mod Podge over the entire paper and tile and side as well. Let dry 15 minutes.  
Side note: If at any time you see the paint you added around the sides and edge has rubbed off go ahead and touch it up before you add the second coat of Mod Podge.

In this picture can you see the 1st coat of Mod Podge dried clear, but if you look closely you can see the line are going from top to bottom. This second coat of Mod Podge apply going side to side.   
Add a second coat of Mod Podge going horizontal (side to side). Let dry 15 mins. 
Using E6000 add felt to the back of tiles. Let dry before going on to the next step.
Once everything is dry, lightly spray this sealant by Rust-Oleum. Just one coat and lay all the tiles out and let dry overnight. Just to be safe. There you have it, lovely coasters for anyone to use.
Here is the two set I made. 
Great gift right? How about a giveaway?

Today I am going to giveaway (open to US only) these two set of ceramic coasters to two people. All you have to do is:

  1. Leave a comment below
  2. Follow me on twitter
  3. Like my Facebook page
If you have a twitter account and/or Facebook let me know when you leave a comment below and I will follow back. Also, on December 11, I will announce the two winners in the morning. Then you can email me your address. Come back this Friday, December 7 for my tutorial on the etch glass without using a Silhouette machine + another giveaway. It's the season to getting crafty and going handmade! Thanks so much for stopping by! Have a great day and see you Friday!
Hugs,

Vanessa